Subscribe For Free Updates!

We'll not spam mate! We promise.

Showing posts with label Blogger Tips. Show all posts

How To Disable CopyNShare - Text Copied Ending With #sthash


The most frequently asked question by our readers is that, they suspected someone (maybe an hacker) is tampering with their blog, because they notice that when they copied any line of text on their blog, it always come with - See more at: The post url #sthash, how can they fix that? This problem also occur on this blog too due to the ShareThis script that was used on this blog. This is not a problem friends, it just another intergration of new tracking feature introduce by Sharethis called CopyNShare.

CopyNShare can be use to track all sharing that occur on your blog when a user copies and paste any line of your blog which always come with a unique #sthashtag after the pasted text.
If you have been using ShareThis widget or our floating bar, then you may experience such bug. All what we need to do is to disable CopyNShare.


How to disable CopyNShare in Wordpress

  • Go to Plugins > ShareThis 
  • Uncheck Enable CopyNShare Beta


  •  Done!

How to disable CopyNShare in Blogger

  • Go to your blogger dashboard
  • Click on Template > Edit HTML > Proceed (Mark/Tick Expand Widget Template)
  • Use ctrl F to find the following line

<script type='text/javascript'>stLight.options({publisher: "xxx-xxxxxxx-xxxxxx-xxxxxxxx"});</script>

To find the above code easily, simply search for stLight.options and replace the script above with the following code.

<script type='text/javascript'>stLight.options({onhover:false , doNotHash: true, doNotCopy: true, hashAddressBar: false});</script>

  • Save your template and you are done!

Now you will be able to copy and line of text in your blog without any text ending it. If you have been experiencing any difficulty in using any of our script, we really apologies, everything should now be working fine now. Any queries or suggestions is welcome.

Credits: realcombiz


All Time Popup With Facebook LikeBox For Blogger Blogs

If you've been a fervent reader of my blog post you'll notice we (Nairotech team) recently lauched our ENTERTAINMENT BLOG, which is GIST EMPEROR.. and within the first two months we started having #1,598 unique visitors and #2,354 avg visit perday with an alexa rank of #894,098...

To be candid with you, i got most of my traffic from facebook and twitter that's why social media sites are very important....and needed in your blogging carrier. Well, this brings us to our topic and discussion for today.. Everybody needs more fans (active) added to their facebook page or any other social media platform, that's why i had to bring up this post so you to can acquire more fans with this widget to help boost your social presence and income online too.


You'll notice we already have so many trending facebook pop-up  boxes avaivable but i prefer sharinq this with you because it's simple and very ok to use... Some of your blog readers will be deterred seeing a troubling pop-up box whenever they visit, so i urge you to use this..

This popup shows the like box with pictures. It also  enables readers to give good facebook feedbaccks and support. It is the curious way of targeting more people to drive into your blog. 


How To Add Simple Facebook Pop-up To Your Blogger Blog

1. Login to your Blogger account

2. Go to dashboard and move on Layout section


3. Click on Add a gadget link and select HTML/JavaScript option


<style type="text/css">
#nairotech-box {
position:fixed !important;
position:absolute;
top:-1000px;
left:50%;
margin:0px 0px 0px -182px;
width:300px;
height:auto;
padding:16px;
background:#FEFEFE;font:normal Dosis, Georgia, Serif;
color:#111;
border:2px solid #333;
-webkit-box-shadow:0px 1px 2px rgba(0,0,0,0.4);
-moz-box-shadow:0px 1px 2px rgba(0,0,0,0.4);
box-shadow:0px 1px 2px rgba(0,0,0,0.4);
-webkit-border-radius:10px;
-moz-border-radius:10px;
border-radius:10px;
}
#nairotech-box a.bsclose {
position:absolute;
top:-10px;
right:-10px;
background:#fff;
font:bold 16px Arial, Sans-Serif;
text-decoration:none;
line-height:22px;
width:22px;
text-align:center;
color:#000000;
border:2px solid #333;
-webkit-box-shadow:0px 1px 2px rgba(0,0,0,0.4);
-moz-box-shadow:0px 1px 2px rgba(0,0,0,0.4);
box-shadow:0px 1px 2px rgba(0,0,0,0.4);
-webkit-border-radius:22px;
-moz-border-radius:22px;
border-radius:25px;
cursor:pointer;
}
</style>
<script src="http://ajax.googleapis.com/ajax/libs/jquery/1.4.1/jquery.min.js" type="text/javascript"></script>
<script type="text/javascript">
$(window).bind("load", function() {
$('#nairotech-box').animate({top:"50px"}, 1000);
$('a.bsclose').click(function() {
$(this).parent().fadeOut();
return false;
});
});
</script>
<div id="nairotech-box">
<!-- Widget by www.nairotech.com Start -->
<center>
<b><a class="Blogtariff" href="http://www.blogger.com/null">Don't Forget To Like Us</a></b>
</center>
<center>
<iframe allowtransparency="true" frameborder="0" scrolling="no" src="//www.facebook.com/plugins/likebox.php?href=https%3A%2F%2Fwww.facebook.com%2Fnairotech&amp;width=292&amp; height=258&amp;show_faces=true&amp; colorscheme=light&amp;stream=false&amp; show_border=true&amp; header=false" style="border: none; height: 258px; overflow: hidden; width: 292px;">
</iframe>
</center>
<!-- Widget by www.nairotech.com End -->
<a class='bsclose' href='#'>&times;</a>
<center style="float:right; margin-right:10px;"><span style="font-size:xx-small; color:#000; text-decoration:none;">+Get this at</span> <a target='_blank' style="font-size:xx-small; color:#3B78CD; text-decoration:none;" href="http://goo.gl/LdBXPI">nairotech</a></center>
</div>
</div>
Replace nairotech with facebook fanpage name of your blog.

That's all. You are done!
Finally, Click on the Save the buton.

If you encounter any problem, feel free and comment below to get a solution. Share your Experience with us by commenting below.


How to automatically share your blog post to Facebook, Twitter, Google+ e.t.c.

Scheduling blog posts to post when you are out of reach or busy with something else is actually a big relief. And you can agree with me than Social media sites like Facebook, Google +, Twitter are good medium to acquire quick readers, fans and gain loads of traffic to your blog. That's why i promised Charles a Nairotech Blog reader to share this topic. For me, i use Dlvr to automatically post my Blog updates to Facebook, Twitter and Google+. But today, i will focus on a different medium of exporting our blog post to Social media sites.. Just follow the procedures below


Almost every blogger loves to share their new post on social media pages to notify readers, friends and followers about their new post. But some bloggers find it tedious updating their social media pages with latest post.
In this post, I will be sharing with you on how your blog post can automatically be shared on your social media pages immediately your post is made.
At the end of this tutorial, you will be able to automatically feed your twitter, facebook and LinkedIn page with your new post.
How to Get Started
Goto:   www.twitterfeed.com


=> Click on “Register Now
=> A Sign Up page comes up, fill in the page and Click on “Create Account
=> Immediately you click on “Create Account” another page comes up
=> In the Feed Name, type in the name of your blog e.g NAIROTECHBLOG
=> In the Blog URL or RSS Feed URL, input your blog url e.g www.nairotech.com
=> Then click on “Continue to Step 2
=> Select the social media you would like to auto share your blog post and Authenticate your profile page
=> Click on “Create Service” and “All Done! immediately you have successfully Authenticate your social network page
That’s all.
Note: you need to log in your social media page to be able to Authenticate your profile page.
Enjoy!


How to center any Blogger widget in Blogger


I am glad to bring you this topic today because i recently  encountered a challenge based on how to center a widget in my New Entertainment BLOG .
After several trials with no good result, i got exhausted & confused on what step to take. Infact, because of several failed trials i had no choice but to delete the blog severally(3 times) and later succeeded in creating a better Blog. So, are you now convinced that i went through a lot to get this achieved? Ok, let's get down to real business now.


How To Align Your Blogger widget/gadget to the center:

The codes below can be used to align your custom or third party widgets to the center via Blogger Dashboard > Layout > Add Gadget > HTML/Java Scripts 
Option one
<div align="center">Your Widget Code</div>
Option two
<center>Your Widget Code</center>
Option three
<p align="center">Your Widget Code</p>
Simply replace the text in blue with your widget code.

Add the CSS rule to all widgets

The CSS rule below will center all widgets on your blog.  Go to your Blogger dashboard > Template Customise > Advanced > Add CSS and apply to blog.
.widget {text-align: center;}
The CSS rule below will center any one of your widgets.  Replace the text in blue with the widget ID.  Go to your Blogger dashboard > Template Customise > Advanced > Add CSS and apply to blog.
#Your-widget-ID {text-align: center;}

Friend have fun with Tutorial and don't forget to drop your comments and tell us what you think about this trick. Bye for now!


Disable Right Click With Alert Messege / Without Alert

Today, i want to teach you all how to create and disable right click with alert message on your blog/blogs. You'll notice so many people complain of copyright issue, how they spent hours of time composing an article just to see their post everywhere without a backlink to their blog. For me, i don't really find it interesting at all. Ok, let's proceed..follow my step ok..??


1. Dashboard >Design>Add a Page element >html/javascript


2. Copy this code ~>


<script language=JavaScript>
<!--

//edit by unwanted


var message="PUT YOUR MESSEGE HERE";

///////////////////////////////////
function clickIE4(){
if (event.button==2){
alert(message);
return false;
}
}

function clickNS4(e){
if (document.layers||document.getElementById&&!document.all){
if (e.which==2||e.which==3){
alert(message);
return false;
}
}
}

if (document.layers){
document.captureEvents(Event.MOUSEDOWN);
document.onmousedown=clickNS4;
}
else if (document.all&&!document.getElementById){
document.onmousedown=clickIE4;
}

document.oncontextmenu=new Function("alert(message);return false")

// -->
</script>


NOTE~> Purple Colour=Put your messege there..enjoy it..


_____________________________________________________________________________
Disable Right Click Without Alert


Wait.... I Also Want To Teach You How To Disable Right Click Without Alert Message..


1. Dashboard ~> Design ~> Add Gadget ~> Pilih Html/JavaScript

2. Paste this code and paste to your Html/JavaScript


<script language=JavaScript>
<!--

//Disable right click script III- By Harold (info@nairotech.com)
//For full source code, visit http://www.nairotech.com

var message="";
///////////////////////////////////
function clickIE() {if (document.all) {(message);return false;}}
function clickNS(e) {if
(document.layers||(document.getElementById&&!document.all)) {
if (e.which==2||e.which==3) {(message);return false;}}}
if (document.layers)
{document.captureEvents(Event.MOUSEDOWN);document.onmousedown=clickNS;}
else{document.onmouseup=clickNS;document.oncontextmenu=clickIE;}

document.oncontextmenu=new Function("return false")
// -->
</script>

3. Save It..Enjoy.. You can check-out our Entertainment Blog Here: Gist Emperor and tell what you think about it. Thanks and don't forget to use the COMMENT BOX...


How to share your posts to Google+ automatically

Two of the biggest challenges we hear from bloggers are finding new followers, and engaging in a dialogue with their readers. By sharing your post to Google+, you enable an entirely new group of people to find and follow you. When you upgrade your blog to connect with Google+, the authorship information on your blog will reflect your common name as listed on your Google+ profile. You can then choose to associate certain blogs with a Page, or certain blogs with your profile. This association determines to which streams the posts will be shared once they're published.

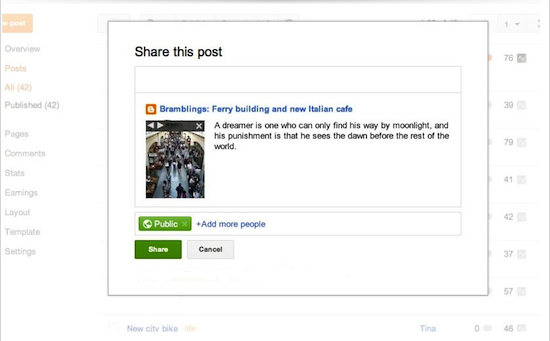
When you publish a post, a pre-filled share box will be displayed. Select the circles that you wish to share with, add a custom message if you like, and click “Share.” Your post will then appear in either your Page or Profile’s (depending on which you’ve chosen for that specific blog) Google+ stream, as well as in the streams of those you’ve shared with.
Here’s how to get started:
This sharing option, along with future Blogger and Google+ integrations, is available to users who have linked their Google+ profile or Google+ page to their blogs so that they can blog and share to Google+ under the same common name.
To associate your blog with your Google+ page or profile, click the Google+ tab to get started.
Once you associate your blog with Google+, go ahead and write your post. After you hit Publish, you’ll see a share box inviting you to share your post with your circles on Google+. Note that the default circle is set to “Public,” but that you can modify your circles every time you choose to share.
Always show
If you don't want the share box to pop up after publishing a post, you can change the settings by going to the Google+ tab in Blogger and unchecking the check box at the bottom.
If you only want to share posts sometimes but don’t want to constantly change the setting, or if you want to retroactively share posts, you can use the “Share” option on yourPosts page. Just hover over the post to view the option.


How To Add Like, Dislike and Share Button To Blogger

I am glad to bring to you a very  wonderful and spicy widget which is called the "Rating widget'' Using "Thumbs Up/Thumbs Down" or "Like/Dislike" button on your blog will generate different reactions from people and it will also give you an idea of what your readers love to read on your blog and what they detest.
In this tutorial, we will be sharing how to add Like, Dislike and Share button to your blogger/blogspot blog. And the brain behind this hack is Tien Nguyen


How To Add Like/Dislike Button To Blogger

If you don't have jQuery installed in your template before, then go to Template > Edit HTML > Use ctrl F to find <head> and paste the following code below it.


<script type="text/javascript"src="https://ajax.googleapis.com/ajax/libs/jquery/1.9.1/jquery.min.js"></script>

Now find <data:post.body/> and paste the following code below/after it.

<b:if cond='data:blog.pageType == &quot;item&quot;'>
 <div id='bi-tip-rating-2546'/>
 </b:if>

Search for </body> and insert the following code before/above it.

<!-- Like Or Dislike Button For Blogger By www.Nairotech.com Start -->
<style type="text/css">
#bi-tip-rating-2546 {
 margin: 0.5em 0;
 font-size: 12px!important;
}
#bi-tip-rating-2546 * {
 line-height: 1.3em!important;
}
#bi-tip-rating-2546 .button {
 float: left;
 width: 95px;
 overflow: hidden;
 border: 1px solid #C6C6C6;
 filter: progid:DXImageTransform.Microsoft.Gradient(GradientType=0,StartColorStr=#fff8f8f8,EndColorStr=#ffeeeeee);
 background-image: -moz-linear-gradient(top,#F8F8F8 0,#EEE 100%);
 background-image: -ms-linear-gradient(top,#F8F8F8 0,#EEE 100%);
 background-image: -o-linear-gradient(top,#F8F8F8 0,#EEE 100%);
 background-image: -webkit-gradient(linear,left top,left bottom,color-stop(0,#F8F8F8),color-stop(100%,#EEE));
 background-image: -webkit-linear-gradient(top,#F8F8F8 0,#EEE 100%);
 background-image: linear-gradient(to bottom,#F8F8F8 0,#EEE 100%);
 -moz-border-radius: 2px;
 -webkit-border-radius: 2px;
 border-radius: 2px;
 margin: 0 0.5em 0 0;
 padding: 2px 0;
 filter: alpha(opacity=60);
 opacity: 0.6;
}
#bi-tip-rating-2546 .button:hover {
 filter: alpha(opacity=100);
 opacity: 1;
}
#bi-tip-rating-2546 .button iframe {
 height: 20px;
 margin: 1px 0 0 0;
 position: relative;
 z-index: 9999;
}
#bi-tip-rating-2546 .like.button iframe {
 margin-left: -104px;
}
#bi-tip-rating-2546 .dislike.button iframe {
 margin-left: -92px;
}
#bi-tip-rating-2546 .button div.icon {
 background-image: url(https://blogger.googleusercontent.com/img/b/R29vZ2xl/AVvXsEjkotK9Ryw-MvWFLPvETe1PCMMWTwX_TCq8hyqErhmqvJYdeRX0F074yHJLNgco91pBYyXesxgYQXg5il4ca_33UkGa_Lu9RM6m7Dv4QQLqoR6HywLK0EDKGPdiBaqQ4I3O6AHAv3JiyVE/s1600/ui-icons.png);
 background-repeat: no-repeat;
 height: 20px;
 width: 20px;
 position: absolute;
 z-index: 1;
}
#bi-tip-rating-2546 .like.button div.icon {
 background-position: -252px -26px;
}
#bi-tip-rating-2546 .dislike.button div.icon {
 background-position: -320px -138px;
}
#bi-tip-rating-2546 .like.button {
 width: 85px;
}
#bi-tip-rating-2546 .share.button {
 width: 50px;
 text-align: center;
 padding: 8px;
 color: black;
 font-weight: bold;
 font-size: 12px;
 line-height: 12px!important;
}
#bi-tip-rating-2546 .button div.label {
 position: absolute;
 margin: 4px 0 0 22px;
 color: black;
 font-size: 12px;
 z-index:1;
}
#bi-tip-rating-2546 .button:active {
 border-color: #C6C6C6;
 background-color: #E9E9E9;
 background-image: none;
 -moz-box-shadow: inset 0 1px 1px rgba(0,0,0,.20);
 -ms-box-shadow: inset 0 1px 1px rgba(0,0,0,.20);
 -webkit-box-shadow: inset 0 1px 1px rgba(0, 0, 0, .20);
 box-shadow: inset 0 1px 1px rgba(0, 0, 0, .20);
}
#bi-tip-rating-2546 .share-box {
 margin: 0.5em 0;
 display: none;
}
#bi-tip-rating-2546 input.share-url {
 display:block;
 -moz-box-shadow: inset 0px 1px 1px rgba(0, 0, 0, .1);
 -ms-box-shadow: inset 0px 1px 1px rgba(0, 0, 0, .1);
 -webkit-box-shadow: inset 0px 1px 1px rgba(0, 0, 0, .1);
 box-shadow: inset 0px 1px 1px rgba(0, 0, 0, .1);
 -webkit-border-radius: 2px;
 -moz-border-radius: 2px;
 border-radius: 2px;
 border: 1px solid #ccc;
 padding: 5px;
 width: 50%;
}
#bi-tip-rating-2546 input.share-url:hover {
 -moz-box-shadow: inset 0px 1px 2px rgba(0,0,0,.15);
 -ms-box-shadow: inset 0px 1px 2px rgba(0,0,0,.15);
 -webkit-box-shadow: inset 0px 1px 2px rgba(0, 0, 0, .15);
 box-shadow: inset 0px 1px 2px rgba(0, 0, 0, .15);
}
#bi-tip-rating-2546 .bi-share-button:hover {
 filter: alpha(opacity=90);
 opacity: 0.9;
}
#bi-tip-rating-2546 .bi-share-button {
 display: block;
 float: left;
 width: 32px;
 height: 32px;
 margin: 1% 3% 0 0;
 background-image: url(https://blogger.googleusercontent.com/img/b/R29vZ2xl/AVvXsEgdu7d6JzIhIBRDU297wYIGUKEAOuT-Xduik_Je6GYMmZowWM_APFYVPdUbtZtBMo6mpdyqR4x_uxQiI9Yy-Gl-LOY252I-A0HdqD8p5DYQYi9VU07RatI0TKY6FKDY74xuZCZ3V_igqt0/s1600/social-icons.png);
 background-repeat: no-repeat;
}
#bi-tip-rating-2546 .bi-share-facebook {background-position: 0 -652px;}
#bi-tip-rating-2546 .bi-share-twitter {background-position: 0 -1104px;}
#bi-tip-rating-2546 .bi-share-gplus {background-position: 0 -488px;}
#bi-tip-rating-2546 .bi-share-tumblr {background-position: 0 -380px;}
#bi-tip-rating-2546 .bi-share-pinterest {background-position: 0 0;}
#bi-tip-rating-2546 .bi-share-blogger {background-position: 0 -688px;}
#bi-tip-rating-2546 a.copyright-button:hover {
 text-decoration: underline;
}
#bi-tip-rating-2546 a.copyright-button {
 display: block;
 float: left;
 width: 1em;
 height: 1em;
 background: red;
 color: white;
 text-align: center;
 color: white;
 padding: 0.2em;
 font-size: 10px;
 font-weight: bold;
 margin: 3% 0 0 0;
}
</style>
<script type='text/javascript'>
//<![CDATA[
/* ############################################
Like / Dislike rating system plugin for Blogger by www.nairotech.com
############################################### */
//bi-tip-2546-easy-guide-02
var default_share_description = 'Love it';//default share description when your site has no one
var default_share_title = 'This is it';//default title share when your site has no one
var text_likes = 'Likes';//text use in "like" button
var text_dislikes = 'Dislikes';//text use in dislike button
var _0xaeb7=["\x32\x20\x6A\x3D\x5A\x2E\x31\x30\x2E\x65\x3B\x79\x3D\x6A\x2E\x31\x64\x28\x27\x23\x27\x29\x3B\x6B\x28\x79\x21\x3D\x2D\x31\x29\x7B\x6A\x3D\x6A\x2E\x31\x63\x28\x30\x2C\x79\x29\x7D\x79\x3D\x6A\x2E\x31\x64\x28\x27\x3F\x27\x29\x3B\x6B\x28\x79\x21\x3D\x2D\x31\x29\x7B\x6A\x3D\x6A\x2E\x31\x63\x28\x30\x2C\x79\x29\x7D\x32\x20\x54\x3D\x27\x27\x3B\x56\x28\x69\x3D\x30\x3B\x69\x3C\x32\x39\x3B\x69\x2B\x2B\x29\x7B\x54\x2B\x3D\x27\x25\x31\x4E\x25\x31\x4F\x27\x7D\x42\x20\x4B\x28\x31\x65\x29\x7B\x36\x3D\x27\x3C\x31\x6D\x20\x31\x50\x3D\x22\x30\x22\x20\x31\x51\x3D\x22\x31\x4D\x22\x20\x31\x4C\x3D\x22\x31\x48\x22\x20\x4E\x3D\x22\x71\x3A\x2F\x2F\x48\x2E\x45\x2E\x6C\x2F\x31\x69\x2D\x31\x49\x2D\x31\x4A\x2E\x67\x3F\x31\x4B\x3D\x25\x31\x52\x27\x2B\x54\x2B\x27\x25\x31\x53\x26\x31\x5A\x3D\x25\x32\x30\x23\x27\x2B\x6A\x2B\x31\x65\x2B\x27\x22\x3E\x3C\x5C\x2F\x31\x6D\x3E\x27\x3B\x32\x31\x20\x36\x7D\x32\x20\x31\x67\x3D\x27\x23\x38\x2D\x4C\x2D\x49\x2D\x4F\x27\x3B\x32\x20\x64\x3D\x24\x28\x27\x64\x27\x29\x2E\x44\x28\x29\x3B\x6B\x28\x28\x64\x3D\x3D\x27\x27\x29\x7C\x7C\x7A\x28\x64\x29\x3D\x3D\x27\x41\x27\x29\x7B\x64\x3D\x24\x28\x27\x32\x33\x27\x29\x2E\x44\x28\x29\x7D\x6B\x28\x28\x64\x3D\x3D\x27\x27\x29\x7C\x7C\x7A\x28\x64\x29\x3D\x3D\x27\x41\x27\x29\x7B\x64\x3D\x31\x59\x7D\x32\x20\x66\x3D\x24\x28\x27\x31\x73\x5B\x31\x72\x3D\x22\x66\x22\x5D\x27\x29\x2E\x43\x28\x27\x31\x6E\x27\x29\x3B\x6B\x28\x66\x3D\x3D\x27\x27\x7C\x7C\x7A\x28\x66\x29\x3D\x3D\x27\x41\x27\x29\x7B\x66\x3D\x24\x28\x27\x31\x73\x5B\x31\x72\x3D\x22\x31\x58\x22\x5D\x27\x29\x2E\x43\x28\x27\x31\x6E\x27\x29\x7D\x6B\x28\x66\x3D\x3D\x27\x27\x7C\x7C\x7A\x28\x66\x29\x3D\x3D\x27\x41\x27\x29\x7B\x66\x3D\x31\x54\x7D\x32\x20\x6D\x3D\x27\x27\x3B\x32\x20\x53\x3D\x30\x3B\x32\x20\x51\x3D\x30\x3B\x24\x28\x27\x31\x55\x27\x29\x2E\x31\x47\x28\x42\x28\x29\x7B\x77\x3D\x24\x28\x78\x29\x2E\x31\x71\x28\x29\x3B\x68\x3D\x24\x28\x78\x29\x2E\x31\x70\x28\x29\x3B\x6B\x28\x6D\x3D\x3D\x27\x27\x29\x7B\x6D\x3D\x3D\x24\x28\x78\x29\x2E\x43\x28\x27\x4E\x27\x29\x7D\x6B\x28\x77\x3E\x3D\x53\x26\x26\x68\x3E\x3D\x51\x29\x7B\x53\x3D\x77\x3B\x51\x3D\x68\x3B\x6D\x3D\x3D\x24\x28\x78\x29\x2E\x43\x28\x27\x4E\x27\x29\x7D\x7D\x29\x3B\x6B\x28\x6D\x3D\x3D\x27\x27\x7C\x7C\x7A\x28\x6D\x29\x3D\x3D\x27\x41\x27\x29\x7B\x6D\x3D\x27\x71\x3A\x2F\x2F\x27\x2B\x5A\x2E\x31\x30\x2E\x31\x57\x2B\x27\x2F\x32\x34\x2E\x31\x7A\x27\x7D\x32\x20\x6F\x3D\x47\x28\x6A\x29\x3B\x32\x20\x73\x3D\x47\x28\x64\x29\x3B\x32\x20\x31\x78\x3D\x47\x28\x66\x29\x3B\x32\x20\x50\x3D\x47\x28\x6D\x29\x3B\x32\x20\x59\x3D\x27\x71\x3A\x2F\x2F\x48\x2E\x58\x2E\x6C\x2F\x31\x74\x2F\x31\x74\x2E\x31\x41\x3F\x75\x3D\x27\x2B\x6F\x3B\x32\x20\x31\x32\x3D\x27\x31\x62\x3A\x2F\x2F\x57\x2E\x6C\x2F\x31\x79\x2F\x31\x42\x3F\x46\x3D\x27\x2B\x6F\x2B\x27\x26\x44\x3D\x27\x2B\x73\x3B\x32\x20\x31\x33\x3D\x27\x31\x62\x3A\x2F\x2F\x31\x43\x2E\x31\x45\x2E\x6C\x2F\x75\x2F\x30\x2F\x34\x3F\x46\x3D\x27\x2B\x6F\x3B\x32\x20\x31\x36\x3D\x27\x71\x3A\x2F\x2F\x48\x2E\x31\x37\x2E\x6C\x2F\x34\x3F\x76\x3D\x33\x26\x74\x3D\x27\x2B\x73\x2B\x27\x26\x75\x3D\x27\x2B\x6F\x3B\x32\x20\x31\x34\x3D\x27\x71\x3A\x2F\x2F\x31\x35\x2E\x6C\x2F\x31\x44\x2F\x31\x46\x2F\x31\x56\x2F\x3F\x46\x3D\x27\x2B\x6F\x2B\x27\x26\x64\x3D\x27\x2B\x73\x2B\x27\x26\x66\x3D\x27\x2B\x31\x78\x2B\x27\x26\x32\x65\x3D\x27\x2B\x50\x3B\x32\x20\x31\x38\x3D\x27\x71\x3A\x2F\x2F\x48\x2E\x45\x2E\x6C\x2F\x31\x69\x2D\x78\x2E\x67\x3F\x6E\x3D\x27\x2B\x73\x2B\x27\x26\x62\x3D\x25\x32\x45\x2B\x65\x25\x32\x46\x25\x32\x32\x27\x2B\x6F\x2B\x27\x25\x32\x32\x2B\x25\x31\x75\x27\x2B\x73\x2B\x27\x25\x32\x47\x25\x32\x44\x25\x31\x75\x26\x32\x43\x3D\x27\x2B\x50\x3B\x32\x20\x36\x3D\x27\x27\x3B\x36\x2B\x3D\x27\x3C\x35\x20\x37\x3D\x22\x52\x20\x63\x22\x3E\x3C\x35\x20\x37\x3D\x22\x31\x31\x22\x3E\x3C\x2F\x35\x3E\x3C\x35\x20\x37\x3D\x22\x31\x76\x22\x3E\x27\x2B\x32\x7A\x2B\x27\x3C\x2F\x35\x3E\x27\x2B\x4B\x28\x27\x32\x41\x27\x29\x2B\x27\x3C\x2F\x35\x3E\x27\x3B\x36\x2B\x3D\x27\x3C\x35\x20\x37\x3D\x22\x55\x20\x63\x22\x3E\x3C\x35\x20\x37\x3D\x22\x31\x31\x22\x3E\x3C\x2F\x35\x3E\x3C\x35\x20\x37\x3D\x22\x31\x76\x22\x3E\x27\x2B\x32\x49\x2B\x27\x3C\x2F\x35\x3E\x27\x2B\x4B\x28\x27\x32\x42\x27\x29\x2B\x27\x3C\x2F\x35\x3E\x27\x3B\x36\x2B\x3D\x27\x3C\x61\x20\x37\x3D\x22\x34\x20\x63\x22\x20\x65\x3D\x22\x23\x32\x48\x22\x3E\x32\x35\x3C\x2F\x61\x3E\x27\x3B\x36\x2B\x3D\x27\x3C\x35\x20\x4A\x3D\x22\x31\x68\x3A\x31\x6A\x3B\x4D\x3A\x31\x6B\x3B\x22\x3E\x3C\x2F\x35\x3E\x3C\x35\x20\x37\x3D\x22\x34\x2D\x31\x61\x22\x3E\x27\x3B\x36\x2B\x3D\x27\x3C\x32\x4D\x20\x37\x3D\x22\x34\x2D\x46\x22\x20\x32\x4F\x3D\x22\x27\x2B\x6A\x2B\x27\x22\x2F\x3E\x27\x3B\x36\x2B\x3D\x27\x3C\x61\x20\x70\x3D\x22\x72\x22\x20\x37\x3D\x22\x38\x2D\x34\x2D\x58\x20\x38\x2D\x34\x2D\x63\x22\x20\x65\x3D\x22\x27\x2B\x59\x2B\x27\x22\x3E\x3C\x2F\x61\x3E\x27\x3B\x36\x2B\x3D\x27\x3C\x61\x20\x70\x3D\x22\x72\x22\x20\x37\x3D\x22\x38\x2D\x34\x2D\x57\x20\x38\x2D\x34\x2D\x63\x22\x20\x65\x3D\x22\x27\x2B\x31\x32\x2B\x27\x22\x3E\x3C\x2F\x61\x3E\x27\x3B\x36\x2B\x3D\x27\x3C\x61\x20\x70\x3D\x22\x72\x22\x20\x37\x3D\x22\x38\x2D\x34\x2D\x32\x50\x20\x38\x2D\x34\x2D\x63\x22\x20\x65\x3D\x22\x27\x2B\x31\x33\x2B\x27\x22\x3E\x3C\x2F\x61\x3E\x27\x3B\x36\x2B\x3D\x27\x3C\x61\x20\x70\x3D\x22\x72\x22\x20\x37\x3D\x22\x38\x2D\x34\x2D\x31\x37\x20\x38\x2D\x34\x2D\x63\x22\x20\x65\x3D\x22\x27\x2B\x31\x36\x2B\x27\x22\x3E\x3C\x2F\x61\x3E\x27\x3B\x36\x2B\x3D\x27\x3C\x61\x20\x70\x3D\x22\x72\x22\x20\x37\x3D\x22\x38\x2D\x34\x2D\x31\x35\x20\x38\x2D\x34\x2D\x63\x22\x20\x65\x3D\x22\x27\x2B\x31\x34\x2B\x27\x22\x3E\x3C\x2F\x61\x3E\x27\x3B\x36\x2B\x3D\x27\x3C\x61\x20\x70\x3D\x22\x72\x22\x20\x37\x3D\x22\x38\x2D\x34\x2D\x45\x20\x38\x2D\x34\x2D\x63\x22\x20\x65\x3D\x22\x27\x2B\x31\x38\x2B\x27\x22\x3E\x3C\x2F\x61\x3E\x27\x3B\x36\x2B\x3D\x27\x3C\x61\x20\x70\x3D\x22\x72\x22\x20\x37\x3D\x22\x32\x4E\x2D\x63\x22\x20\x65\x3D\x22\x71\x3A\x2F\x2F\x32\x4A\x2E\x6C\x2F\x32\x4B\x2F\x52\x2D\x32\x4C\x2D\x55\x2D\x49\x2D\x32\x78\x2D\x56\x2D\x45\x22\x20\x4A\x3D\x22\x32\x66\x3A\x20\x32\x79\x21\x39\x3B\x4D\x3A\x20\x32\x67\x21\x39\x3B\x31\x71\x3A\x20\x31\x6F\x21\x39\x3B\x31\x70\x3A\x20\x31\x6F\x21\x39\x3B\x32\x68\x3A\x20\x32\x69\x21\x39\x3B\x31\x77\x3A\x20\x31\x39\x21\x39\x3B\x44\x2D\x32\x64\x3A\x20\x32\x63\x21\x39\x3B\x31\x77\x3A\x20\x31\x39\x21\x39\x3B\x32\x37\x3A\x20\x30\x2E\x32\x36\x21\x39\x3B\x31\x6C\x2D\x32\x38\x3A\x20\x32\x61\x21\x39\x3B\x31\x6C\x2D\x32\x62\x3A\x20\x32\x6A\x21\x39\x3B\x32\x6B\x3A\x20\x33\x25\x20\x30\x20\x30\x20\x30\x3B\x32\x74\x3A\x20\x32\x73\x28\x31\x66\x3D\x32\x75\x29\x21\x39\x3B\x31\x66\x3A\x20\x31\x21\x39\x3B\x32\x76\x3A\x32\x77\x21\x39\x3B\x32\x72\x3A\x32\x71\x21\x39\x22\x20\x64\x3D\x22\x32\x6D\x20\x32\x6C\x20\x52\x20\x78\x3F\x22\x3E\x3F\x3C\x2F\x61\x3E\x27\x3B\x36\x2B\x3D\x27\x3C\x35\x20\x4A\x3D\x22\x31\x68\x3A\x31\x6A\x3B\x4D\x3A\x31\x6B\x3B\x22\x3E\x3C\x2F\x35\x3E\x3C\x2F\x35\x3E\x27\x3B\x24\x28\x31\x67\x29\x2E\x36\x28\x36\x29\x3B\x24\x28\x27\x23\x38\x2D\x4C\x2D\x49\x2D\x4F\x20\x2E\x34\x2E\x63\x27\x29\x2E\x32\x6E\x28\x42\x28\x29\x7B\x24\x28\x27\x23\x38\x2D\x4C\x2D\x49\x2D\x4F\x20\x2E\x34\x2D\x31\x61\x27\x29\x2E\x32\x6F\x28\x27\x32\x70\x27\x2C\x42\x28\x29\x7B\x7D\x29\x7D\x29\x3B","\x7C","\x73\x70\x6C\x69\x74","\x7C\x7C\x76\x61\x72\x7C\x7C\x73\x68\x61\x72\x65\x7C\x64\x69\x76\x7C\x68\x74\x6D\x6C\x7C\x63\x6C\x61\x73\x73\x7C\x62\x69\x7C\x69\x6D\x70\x6F\x72\x74\x61\x6E\x74\x7C\x7C\x7C\x62\x75\x74\x74\x6F\x6E\x7C\x74\x69\x74\x6C\x65\x7C\x68\x72\x65\x66\x7C\x64\x65\x73\x63\x72\x69\x70\x74\x69\x6F\x6E\x7C\x7C\x7C\x7C\x6E\x61\x6B\x65\x5F\x75\x72\x6C\x7C\x69\x66\x7C\x63\x6F\x6D\x7C\x6D\x65\x64\x69\x61\x5F\x75\x72\x6C\x7C\x7C\x65\x6E\x63\x6F\x64\x65\x5F\x75\x72\x6C\x7C\x74\x61\x72\x67\x65\x74\x7C\x68\x74\x74\x70\x7C\x5F\x62\x6C\x61\x6E\x6B\x7C\x65\x6E\x63\x6F\x64\x65\x5F\x74\x69\x74\x6C\x65\x7C\x7C\x7C\x7C\x7C\x74\x68\x69\x73\x7C\x69\x6E\x64\x65\x78\x7C\x74\x79\x70\x65\x6F\x66\x7C\x75\x6E\x64\x65\x66\x69\x6E\x65\x64\x7C\x66\x75\x6E\x63\x74\x69\x6F\x6E\x7C\x61\x74\x74\x72\x7C\x74\x65\x78\x74\x7C\x62\x6C\x6F\x67\x67\x65\x72\x7C\x75\x72\x6C\x7C\x65\x6E\x63\x6F\x64\x65\x55\x52\x49\x43\x6F\x6D\x70\x6F\x6E\x65\x6E\x74\x7C\x77\x77\x77\x7C\x72\x61\x74\x69\x6E\x67\x7C\x73\x74\x79\x6C\x65\x7C\x72\x61\x74\x65\x5F\x69\x74\x65\x6D\x5F\x68\x74\x6D\x6C\x7C\x74\x69\x70\x7C\x66\x6C\x6F\x61\x74\x7C\x73\x72\x63\x7C\x32\x35\x34\x36\x7C\x65\x6E\x63\x6F\x64\x65\x5F\x6D\x65\x64\x69\x61\x5F\x75\x72\x6C\x7C\x63\x68\x7C\x6C\x69\x6B\x65\x7C\x63\x77\x7C\x6C\x61\x62\x65\x6C\x5F\x73\x70\x61\x63\x65\x7C\x64\x69\x73\x6C\x69\x6B\x65\x7C\x66\x6F\x72\x7C\x74\x77\x69\x74\x74\x65\x72\x7C\x66\x61\x63\x65\x62\x6F\x6F\x6B\x7C\x73\x6C\x5F\x66\x61\x63\x65\x62\x6F\x6F\x6B\x7C\x77\x69\x6E\x64\x6F\x77\x7C\x6C\x6F\x63\x61\x74\x69\x6F\x6E\x7C\x69\x63\x6F\x6E\x7C\x73\x6C\x5F\x74\x77\x69\x74\x74\x65\x72\x7C\x73\x6C\x5F\x67\x70\x6C\x75\x73\x7C\x73\x6C\x5F\x70\x69\x6E\x74\x65\x72\x65\x73\x74\x7C\x70\x69\x6E\x74\x65\x72\x65\x73\x74\x7C\x73\x6C\x5F\x74\x75\x6D\x62\x6C\x72\x7C\x74\x75\x6D\x62\x6C\x72\x7C\x73\x6C\x5F\x62\x6C\x6F\x67\x67\x65\x72\x7C\x77\x68\x69\x74\x65\x7C\x62\x6F\x78\x7C\x68\x74\x74\x70\x73\x7C\x73\x75\x62\x73\x74\x72\x69\x6E\x67\x7C\x69\x6E\x64\x65\x78\x4F\x66\x7C\x6D\x65\x74\x68\x6F\x64\x7C\x6F\x70\x61\x63\x69\x74\x79\x7C\x68\x6F\x6C\x64\x65\x72\x7C\x63\x6C\x65\x61\x72\x7C\x62\x6C\x6F\x67\x7C\x62\x6F\x74\x68\x7C\x6E\x6F\x6E\x65\x7C\x66\x6F\x6E\x74\x7C\x69\x66\x72\x61\x6D\x65\x7C\x63\x6F\x6E\x74\x65\x6E\x74\x7C\x31\x65\x6D\x7C\x68\x65\x69\x67\x68\x74\x7C\x77\x69\x64\x74\x68\x7C\x6E\x61\x6D\x65\x7C\x6D\x65\x74\x61\x7C\x73\x68\x61\x72\x65\x72\x7C\x33\x45\x7C\x6C\x61\x62\x65\x6C\x7C\x63\x6F\x6C\x6F\x72\x7C\x65\x6E\x63\x6F\x64\x65\x5F\x64\x65\x73\x63\x72\x69\x70\x74\x69\x6F\x6E\x7C\x69\x6E\x74\x65\x6E\x74\x7C\x69\x63\x6F\x7C\x70\x68\x70\x7C\x74\x77\x65\x65\x74\x7C\x70\x6C\x75\x73\x7C\x70\x69\x6E\x7C\x67\x6F\x6F\x67\x6C\x65\x7C\x63\x72\x65\x61\x74\x65\x7C\x65\x61\x63\x68\x7C\x6E\x6F\x7C\x70\x6F\x73\x74\x7C\x72\x65\x61\x63\x74\x69\x6F\x6E\x73\x7C\x6F\x70\x74\x69\x6F\x6E\x73\x7C\x73\x63\x72\x6F\x6C\x6C\x69\x6E\x67\x7C\x74\x72\x75\x65\x7C\x32\x36\x6E\x62\x73\x70\x7C\x33\x42\x7C\x66\x72\x61\x6D\x65\x62\x6F\x72\x64\x65\x72\x7C\x61\x6C\x6C\x6F\x77\x74\x72\x61\x6E\x73\x70\x61\x72\x65\x6E\x63\x79\x7C\x35\x42\x61\x7C\x35\x44\x7C\x64\x65\x66\x61\x75\x6C\x74\x5F\x73\x68\x61\x72\x65\x5F\x64\x65\x73\x63\x72\x69\x70\x74\x69\x6F\x6E\x7C\x69\x6D\x67\x7C\x62\x6F\x6F\x6B\x6D\x61\x72\x6B\x6C\x65\x74\x7C\x68\x6F\x73\x74\x6E\x61\x6D\x65\x7C\x44\x65\x73\x63\x72\x69\x70\x74\x69\x6F\x6E\x7C\x64\x65\x66\x61\x75\x6C\x74\x5F\x73\x68\x61\x72\x65\x5F\x74\x69\x74\x6C\x65\x7C\x74\x65\x78\x74\x43\x6F\x6C\x6F\x72\x7C\x32\x33\x30\x30\x30\x30\x30\x30\x7C\x72\x65\x74\x75\x72\x6E\x7C\x7C\x68\x31\x7C\x66\x61\x76\x69\x63\x6F\x6E\x7C\x53\x68\x61\x72\x65\x7C\x32\x65\x6D\x7C\x70\x61\x64\x64\x69\x6E\x67\x7C\x73\x69\x7A\x65\x7C\x7C\x31\x30\x70\x78\x7C\x77\x65\x69\x67\x68\x74\x7C\x63\x65\x6E\x74\x65\x72\x7C\x61\x6C\x69\x67\x6E\x7C\x6D\x65\x64\x69\x61\x7C\x64\x69\x73\x70\x6C\x61\x79\x7C\x6C\x65\x66\x74\x7C\x62\x61\x63\x6B\x67\x72\x6F\x75\x6E\x64\x7C\x72\x65\x64\x7C\x62\x6F\x6C\x64\x7C\x6D\x61\x72\x67\x69\x6E\x7C\x6F\x6E\x65\x7C\x57\x61\x6E\x74\x7C\x63\x6C\x69\x63\x6B\x7C\x74\x6F\x67\x67\x6C\x65\x7C\x66\x61\x73\x74\x7C\x73\x74\x61\x74\x69\x63\x7C\x70\x6F\x73\x69\x74\x69\x6F\x6E\x7C\x61\x6C\x70\x68\x61\x7C\x66\x69\x6C\x74\x65\x72\x7C\x31\x30\x30\x7C\x76\x69\x73\x69\x62\x69\x6C\x69\x74\x79\x7C\x76\x69\x73\x69\x62\x6C\x65\x7C\x73\x79\x73\x74\x65\x6D\x7C\x62\x6C\x6F\x63\x6B\x7C\x74\x65\x78\x74\x5F\x6C\x69\x6B\x65\x73\x7C\x30\x32\x30\x31\x7C\x30\x32\x30\x32\x7C\x65\x75\x72\x6C\x7C\x32\x46\x61\x7C\x33\x43\x61\x7C\x33\x44\x7C\x33\x43\x7C\x73\x68\x61\x72\x65\x74\x68\x69\x73\x7C\x74\x65\x78\x74\x5F\x64\x69\x73\x6C\x69\x6B\x65\x73\x7C\x62\x6C\x6F\x67\x67\x65\x72\x69\x74\x65\x6D\x73\x7C\x74\x69\x70\x73\x7C\x61\x6E\x64\x7C\x69\x6E\x70\x75\x74\x7C\x63\x6F\x70\x79\x72\x69\x67\x68\x74\x7C\x76\x61\x6C\x75\x65\x7C\x67\x70\x6C\x75\x73","","\x66\x72\x6F\x6D\x43\x68\x61\x72\x43\x6F\x64\x65","\x72\x65\x70\x6C\x61\x63\x65","\x5C\x77\x2B","\x5C\x62","\x67"];eval(function (_0x9c61x1,_0x9c61x2,_0x9c61x3,_0x9c61x4,_0x9c61x5,_0x9c61x6){_0x9c61x5=function (_0x9c61x3){return (_0x9c61x3<_0x9c61x2?_0xaeb7[4]:_0x9c61x5(parseInt(_0x9c61x3/_0x9c61x2)))+((_0x9c61x3=_0x9c61x3%_0x9c61x2)>35?String[_0xaeb7[5]](_0x9c61x3+29):_0x9c61x3.toString(36));} ;if(!_0xaeb7[4][_0xaeb7[6]](/^/,String)){while(_0x9c61x3--){_0x9c61x6[_0x9c61x5(_0x9c61x3)]=_0x9c61x4[_0x9c61x3]||_0x9c61x5(_0x9c61x3);} ;_0x9c61x4=[function (_0x9c61x5){return _0x9c61x6[_0x9c61x5];} ];_0x9c61x5=function (){return _0xaeb7[7];} ;_0x9c61x3=1;} ;while(_0x9c61x3--){if(_0x9c61x4[_0x9c61x3]){_0x9c61x1=_0x9c61x1[_0xaeb7[6]]( new RegExp(_0xaeb7[8]+_0x9c61x5(_0x9c61x3)+_0xaeb7[8],_0xaeb7[9]),_0x9c61x4[_0x9c61x3]);} ;} ;return _0x9c61x1;} (_0xaeb7[0],62,176,_0xaeb7[3][_0xaeb7[2]](_0xaeb7[1]),0,{}));
//]]>
</script>
<!-- Like Or Dislike Button For Blogger By www.Nairotech.com End -->

Save your template and you are done!
Hope you love this blogger ThumbsUp, ThumbsDown and share buttons? Feel free to share it to all your networks using the share buttons below. 


How to make money online

With the Growing popularity of the internet, one question that has been central to most of the messages I have received via Short Message Service and emails is: How to make money online? Truth is, making money online has become a hot topic globally. In line with this trend, therefore, the Ministry of Communications Technology has recently inaugurated the Naijacloud project with the primary objective of creating awareness about online work opportunities for millions of unemployed Nigerian youths.


 This has simply given credence to the fact even the Nigerian Government is eager to provive online jobs for its citizens. My experience in making money online dates back to 2006, and since then, I have learnt a lot and have been involved in various kinds of online business ventures. I will mention a few of them to serve as a guide where relevant.


HERE ARE SOME OF THE ONLINE MONEY MAKING OPPORTUNITIES AVAILABLE TO YOU:


  • Take your business online
When people ask me about making money online, I simply ask them if they already had a business. If the answer is yes, I advise them to go online. This is one of the fastest ways to make money online. Taking your business online is nothing other than developing a simple website with e-commerce capabilities such that a potential client can visit and place orders for your products or services.


  • Sell a product or offer a service
This is closely related to the firstpoint discussed above. You can never make money online if you do not have a product or service that someone, somewhere is willing to pay for. So, create a new product and take it online. How about your services? That too can be unbundled and offered cheaply online. For instance, it may be wise as a legal practitioner to break down the services you offer and place on your website so as to attract Small and Medium Enterprises that usually regard legal services as something only big businesses can afford


  • START A BLOG
One of the goals of the Nairotech is to help you start and run a successful blog using one of the world's most popular blogging Website- Blogger.
For me, the decision to start a professional blog came up four years ago and has really helped me tremendously. Besides the little money I make from advertisements on my blog, there is also an opportunity to make money as an affiliate of other services or products. Most importantly, owning a blog has helped me win big offline consulting gigs and speaking opportunities that I might ordinarily not have been properly positioned for.


  • ONLINE FREELANCING
An increasing number of Nigerians ( I know a few) have jumped on the online freelancing bandwagon and they are truly making ends meet.
Online freelancing is huge at the moment and countries like India is a testimony to  that fact. It is possible to make money online. A number of dervice-based professionals will readily find someone online willing to pay for their services once they are convinced of the value.


  • FOREX  TRADING
A number of people have got their fingers burnt in forex trading, including yours truly, but this is not to say that it does not work. I think what has happened to the majority of people who must have had some sort of negative experiences is the fact that we allowed greed to take control. I have a highly contented friend who still makes money from forex, but a number of forex gurus will consider him a ''mugu'' if they hear he is satisfied with the little he makes.


YOUR TURN:
I have just given you few layed down tips on money making online, you can now add yours using the comment box because my blood is already rushing to hear what you have to say or contribute.. With this medium, we can learn better and exploit other ways of making money online.

Disclaimer: I am not in any way stating that any of these are sure-proof, but they might be worth looking into as a means of making profit from your internet presence.
The most important piece of advice is for you to get involved in something you love and have fun doing...


Add a customised email box below every posts


Adding an email subscription box is very important for every blog or site, without an email subscription box or link the site or blog is useless, if i may use the word; useless, adding it on your website will double your blog visits. If you truly want get more blog reader, i'll advise and suggest you get an email subscription widget on your blog because gets the attention of the reader,most especially when carefully placed and styled properly below your every blog post, it gets there attention more.

Add stylish email subscription box below posts in blogger

How can i add this to my Blog ?

One.) Quickly login to your blogger dashboard, Locate ''TEMPLATE''

TWO.) USE "Ctrl+F" to search for ]]></b:skin> .

Just before ]]></b:skin> , you can paste the codes below


#nrt-box{background: -webkit-gradient(linear, left top, left bottom, from(#00aeef), to(#00aeef));;border:1px
solid #00aeef;border-radius:10px; margin-bottom:10px;padding:10px;text-align:center;background: -moz-linear-gradient(top, #333, #00aeef)}
#nrt-box h1{margin-top:5px; color:#FFF;font-family:georgia;font-size:25px;margin-bottom:5px;padding:0;text-shadow:0 2px 3px #000;line-height:35px}
#nrt-box input{background: -moz-linear-gradient(center top , #FFFFFF, #EFEFEF) repeat scroll 0 0 transparent;border:medium none;border-radius:10px 10px 10px 10px;font-size:14px;padding:10px;text-shadow:1px 1px 0 #FFF;width:280px; color:#666; font-family:georgia; margin-bottom:5px;}
#nrt-box .submit{background: -webkit-gradient(linear, left top, left bottom, from(#369a18), to(#205f0d));background: -moz-linear-gradient(center top , #ff00ff, #ec008c) repeat scroll 0 0 transparent;color:#FFF;cursor:pointer;font-weight:bold;margin-left:20px;text-shadow:0 1px 2px #000;width:120px; font-family:georgia; margin-left:5px;}
#nrt-box .submit:hover{background: -moz-linear-gradient(center top , #9e005d, #9e005d) repeat scroll 0 0 transparent}
#nrt-box .submit:active{background: -moz-linear-gradient(center top , #46B725, #205F0D) repeat scroll 0 0 transparent}
4. USE "Ctrl+F" to locate <data:post.body/> . Just after it, you can paste the below code:

<b:if cond='data:blog.pageType == &quot;item&quot;'>
<div id='nrt-box'><h1>Subscribe To Get FREE Tutorials</h1><form action='http://feedburner.google.com/fb/a/mailverify' method='post' onsubmit='window.open(&apos;http://feedburner.google.com/fb/a/mailverify?uri=nairotech&apos;, &apos;popupwindow&apos;, &apos;scrollbars=yes,width=550,height=520&apos;);return true' target='popupwindow'><center> <input name='email' onblur='if (this.value == &quot;&quot;) {this.value = &quot;Enter Your Email Address...&quot;;}' onfocus='if (this.value == &quot;Enter Your Email Address...&quot;) {this.value = &quot;&quot;}' size='30' type='text' value='Enter Your Email Address...'/> <input name='uri' type='hidden' value='nairotech'/> <input name='loc' type='hidden' value='en_US'/> <input class='submit' type='submit' value='Subscribe'/></center></form></div>
</b:if>
  • Now, you can Replace nairotech with yours.
Email-subscription-box
SCREENSHOT OF THE SUBSCRIPTION BOX


If you liked this Tutorial on how to add a  stylish email subscriotion box below post, then don't forget to comment and use the share buttons, you may as well like us on Facebook and Follow us On TWITTER


Add Two Columns below Sidebar blogger Easily

We came with a nice tutorial today to lighten most of our blogger design issues been experienced by newbies and most professional pro bloggers. Dividing or splitting our blogger side bar can actually give room to add more gadgetsor widgets while trying to manage the little space you have left to add widgets on your blog. It also beautifies and give your blog a taste which your blog visitors would love to see.

I suggest you should try this out using a Test-Blog before integrating it on your blog template.


I know you're already longing to add this on your blog so i won't take much of your time, just follow this simple guides and you should be able to divide and spice your blog template just like ours.
First, Goto your blogger account and move to Layout———-> Edit HTML
Locate this ]]></b:skin> blog template.
And just Paste the below codes just before  ]]></b:skin>
#magazine-left4 {
width: 48%;
float: left;
}
#magazine-right4 {
width: 48%;
float: right;
}
Now, Goto the lower side & locate the code just like this :
<div id='sidebar-wrapper'>
  <b:section class='sidebar' id='sidebar'
preferred='yes'>
<b:widget id='Feed2' locked='false'
title='Recent Posts' type='Feed'/>
<b:widget id='Label99' locked='false'
 title='Labels' type='Label'/>
</b:section>
  </div>
Now, add below code in between  </b:section>  and  </div>
<b:section class='sidebar' id='magazine-left4'
 showaddelement='yes'>
<b:widget id='Text514' locked='false'
title='Column 1' type='Text'/>
</b:section>
<b:section class='sidebar' id='magazine-right4'
 showaddelement='yes'>
<b:widget id='Text524' locked='false'
 title='Column 2' type='Text'/>
</b:section>
<div style="clear: both;"></div>
You can now save your Template and your sidebar should look like this IMAGE shown below.
How to add Two Columns below Sidebar blogger
So, mate... how do you see this tutorial ? Was it help, educative and worth your time?? If yes, then i'll love to hear what you think. Please, don't forget to visit this blog for more educative tutorials you wouldn't want to miss


How to add Contact form on Blogger - Change Style & Install it on Static Pages

While going through various widgets on blogger dashboard i  came across a must use widget that everybody on the bloggersphere network should use on his/her blogsite, which is the contact form.

How to add Contact form on Blogger - Change Style &amp; Install it on Static Pages
  • Field for the user name
  • Field for email
  • Submit Button
  • Field for the message (text-area)
contact form, blogger gadgets, static page
 The design is simple and the text colors inherit the section where you add it. At the moment, this widget has no configuration options and is not available for dynamic views.

How to Add Contact Form to Blogger:
To add it to your blog, just select the Layout tab, then click on Add a gadget in the section you want to show, for example, if is in the sidebar you want to add the contact form. Then, select the More gadgets tab and add the Contact Form gadget.

blogger gadgets, blogger widgets, contact form

Styling Contact Form:

As the background is transparent, the form will integrate well, but it's easy to modify using Style Sheets (CSS) to the appropriate selectors. Here's an example:

/* Contact Form Container */
.contact-form-widget {
width: 500px;
max-width: 100%;
margin: 0 auto;
padding: 10px;
background: #F8F8F8;
color: #000;
border: 1px solid #C1C1C1;
box-shadow: 0 1px 4px rgba(0, 0, 0, 0.25);
border-radius: 10px;
}

/* Fields and submit button */
.contact-form-name, .contact-form-email, .contact-form-email-message {
width: 100%;
max-width: 100%;
margin-bottom: 10px;
}

/* Submit button style */
.contact-form-button-submit {
border-color: #C1C1C1;
background: #E3E3E3;
color: #585858;
width: 20%;
max-width: 20%;
margin-bottom: 10px;
}

/* Submit button on mouseover */
.contact-form-button-submit:hover{
background: #4C8EF9;
color: #ffffff;
border: 1px solid #FAFAFA;
}

This is how it will look like after applying the style:
contact form, blogger gadgets, contact form for blogger

To add this style, go to Template > Edit HTML, click on the sideways arrow next to <b:skin>...</b:skin> and paste the code just above ]]></b:skin> (press CTRL + F to find it):


How To Add Contact Form In A Static Page


First step is to add the Contact Form gadget (Layout) and second, to edit the template (Template > Edit HTML) to remove most of the gadget. You have to search for the id "ContactForm", expand the widget by clicking on the black arrow on the left (same with the includable) and then delete the part that I have colored in red (see below):


Part to be removed:


  <b:widget id='ContactForm1' locked='false' title='Contact Form' type='ContactForm'>
    <b:includable id='main'>
  <b:if cond='data:title != &quot;&quot;'>
    <h2 class='title'><data:title/></h2>
  </b:if>
  <div class='contact-form-widget'>
    <div class='form'>
      <form name='contact-form'>
        <p/>
        <data:contactFormNameMsg/>
        <br/>
        <input class='contact-form-name' expr:id='data:widget.instanceId + &quot;_contact-form-name&quot;' name='name' size='30' type='text' value=''/>
        <p/>
        <data:contactFormEmailMsg/> <span style='font-weight: bolder;'>*</span>
        <br/>
        <input class='contact-form-email' expr:id='data:widget.instanceId + &quot;_contact-form-email&quot;' name='email' size='30' type='text' value=''/>
        <p/>
        <data:contactFormMessageMsg/> <span style='font-weight: bolder;'>*</span>
        <br/>
        <textarea class='contact-form-email-message' cols='25' expr:id='data:widget.instanceId + &quot;_contact-form-email-message&quot;' name='email-message' rows='5'/>
        <p/>
        <input class='contact-form-button contact-form-button-submit' expr:id='data:widget.instanceId + &quot;_contact-form-submit&quot;' expr:value='data:contactFormSendMsg' type='button'/>
        <p/>
        <div style='text-align: center; max-width: 222px; width: 100%'>
          <p class='contact-form-error-message' expr:id='data:widget.instanceId + &quot;_contact-form-error-message&quot;'/>
          <p class='contact-form-success-message' expr:id='data:widget.instanceId + &quot;_contact-form-success-message&quot;'/>
        </div>
      </form>
    </div>
  </div>
  <b:include name='quickedit'/>
</b:includable>
  </b:widget>

After you have saved the template, go to Pages and paste the following code into a new blank page with the title you want:

 <div class='widget ContactForm' id='ContactForm1'>
  <div class='contact-form-widget'>
    <div class='form'>
      <form name='contact-form'>
        <p>Name<p>
        <input class='contact-form-name' id='ContactForm1_contact-form-name' name='name' size='30' type='text' value=''/>
        <p>E-mail *</p>
        <input class='contact-form-email' id='ContactForm1_contact-form-email' name='email' size='30' type='text' value=''/>
        <p>Message *</p>
        <textarea class='contact-form-email-message' cols='25' id='ContactForm1_contact-form-email-message' name='email-message' rows='5'></textarea>
        <input class='contact-form-button contact-form-button-submit' id='ContactForm1_contact-form-submit' type='button' value='Submit'/>
        <p class='contact-form-error-message' id='ContactForm1_contact-form-error-message'></p>
        <p class='contact-form-success-message' id='ContactForm1_contact-form-success-message'></p>
      </form>
    </div>
  </div>
</div>
Messages will be sent to the same email that you have registered in Blogger.

Hope you enjoyed this tutorial? Please, use the share buttons and make sure you drop a comment below so i can know if my little tutorial helped or not.Thanks for stopping by!