Subscribe For Free Updates!

We'll not spam mate! We promise.

Showing posts with label Google plus. Show all posts

How to share your posts to Google+ automatically

Two of the biggest challenges we hear from bloggers are finding new followers, and engaging in a dialogue with their readers. By sharing your post to Google+, you enable an entirely new group of people to find and follow you. When you upgrade your blog to connect with Google+, the authorship information on your blog will reflect your common name as listed on your Google+ profile. You can then choose to associate certain blogs with a Page, or certain blogs with your profile. This association determines to which streams the posts will be shared once they're published.

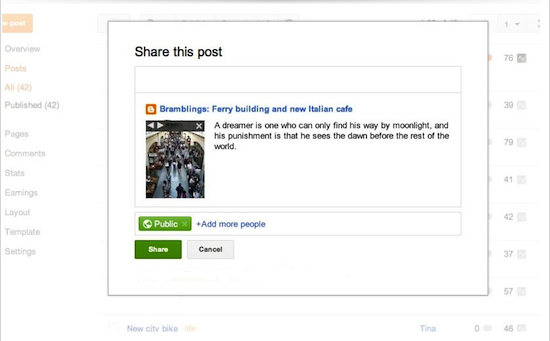
When you publish a post, a pre-filled share box will be displayed. Select the circles that you wish to share with, add a custom message if you like, and click “Share.” Your post will then appear in either your Page or Profile’s (depending on which you’ve chosen for that specific blog) Google+ stream, as well as in the streams of those you’ve shared with.
Here’s how to get started:
This sharing option, along with future Blogger and Google+ integrations, is available to users who have linked their Google+ profile or Google+ page to their blogs so that they can blog and share to Google+ under the same common name.
To associate your blog with your Google+ page or profile, click the Google+ tab to get started.
Once you associate your blog with Google+, go ahead and write your post. After you hit Publish, you’ll see a share box inviting you to share your post with your circles on Google+. Note that the default circle is set to “Public,” but that you can modify your circles every time you choose to share.
Always show
If you don't want the share box to pop up after publishing a post, you can change the settings by going to the Google+ tab in Blogger and unchecking the check box at the bottom.
If you only want to share posts sometimes but don’t want to constantly change the setting, or if you want to retroactively share posts, you can use the “Share” option on yourPosts page. Just hover over the post to view the option.


How To Apply Google Plus Commenting System On Your Blog


Google+ just introduced a new commenting system which Google has introduced that integrates Google+ comments with Blogs. The new system of commenting is an added advantage to the default Blogger system of commenting, & it aids threaded comments too. It's appearance is better. Some of my friends requested via Mail that i post something on this system of commenting. I am putting up this compiled short post tutorial on how to easily install and use this new advanced commenting system.


                                  Moving to Google Plus comments:

To implement Google Plus comments for your Blog, first you have to connect your account to your Google+ account. Just follow these steps.


Login into your Blogger dashboard, and choose your blog you want to connect

Click on the Google+ button from the left sidebar of your Blog

Then, Click on the Get Started button on the top-left side to connect your blog account. This will not appear if your account is already merged.

Follow the simple instructions to connect your blog.

Once you are connected, you will get an option to Use Google+ comments on your blog.

Ticking this will enable the new Google Plus commenting system.

This will automatically change your Google Plus comments on for default templates.

But note it will likely not work for custom blogger templates. So, you will have to change your template code and change some lines as directed in the section below.

                   How To Display Google comments on Custom Blogger Templates

You can Revert to default option>>

Custom templates have configured customed widgets that usually override the default settings. And that is why this commenting system might not easily work with custom templates.

To achieve this, you can revert your Blog Widget to defaults in your template HTML editor via the following steps.


From inside your blog's dashboard, click on Template from the left sidebar.

Click on Edit HTML on your Blog

Then, Click on the Revert Widget templates to defaults button

It will reset other widgets to default as well.

Hope It Helps!